When dealing with things like TWRP, root, custom ROMs, or any other software modifications, there’s always a slight chance of bricks. If your device is in a bricked condition, it is either unable to boot, won’t turn on, or is unresponsive in some other way. Using EDL Mode, you may quickly and simply Unbrick Nothing Phone 1 if it has become unusable for any reason.
A bricked phone basically indicates that it will not boot and is no longer functional. This might be due to a user mistake, such as missing a key step or flashing the wrong firmware file. It might also be the software acting strangely.
Types of Bricked States
If you’re not aware, there are two kinds of bricks that a device can encounter:
Soft Brick
A “soft brick” in Android is a state where the device is still able to boot up, but is stuck in a boot loop or is unresponsive due to some software issue. Here are some common causes of soft bricks in Android devices:
- Failed software updates: When a firmware or software update fails, it can leave the device in a soft brick state.
- Corrupted system files: If the system files of the device become corrupted, it can cause the device to become unresponsive or stuck in a boot loop.
- Modifications: Installing apps or making modifications to the device’s firmware or system that are not compatible with the device’s hardware or software can cause the device to become unresponsive or stuck in a boot loop.
If your Nothing Phone 1 is soft-bricked, it may show signs of life, such as the boot screen, and you may be able to boot it into Fastboot and Recovery modes.
Generally, a Soft Brick could be easily fixed by performing a factory reset or by flashing the stock firmware through Fastboot or Recovery. However, the solution isn’t that simple when dealing with hard-bricks.
Hard Brick
A “hard brick” in Android is a state where the device is unable to boot up at all and is completely unresponsive. This is generally caused due to corrupt/broken critical partitions like the Bootloader itself. In such a case, it is also not possible to boot the phone into Fastboot mode to flash the RAW firmware and unbrick. Here are some common causes of hard bricks in Android devices:
- Failed firmware update: If the firmware update process is interrupted or fails due to a power outage or other issues, it can leave the device in a hard-brick state.
- Incompatible firmware or custom ROMs: Installing firmware or custom ROMs that are not compatible with the device’s hardware or software can cause the device to become hard-bricked.
- Corrupted bootloader or partitions: The bootloader and partitions are essential components of the device’s firmware, and if they become corrupted or damaged, the device can become hard-bricked.
- Physical damage to the device: Dropping the device or exposing it to water or other physical damage can cause the device to become hard-bricked.
If your Nothing Phone 1 is hard-bricked, it will probably only show the black screen and may vibrate when connected to the wall charger.
Fixing a Hard-Bricked Nothing Phone 1
Every device that has the underlying Qualcomm chipset comes with an Emergency Download Mode (EDL mode). And same is the case with Nothing Phone 1 as well. EDL mode could be used to force-flash the firmware and unbrick devices. It utilizes Qualcomm’s Firehose protocol to communicate with a computer and accept digitally signed firmware. To flash the firmware through EDL, device users would often need to utilize a specialized tool such as QPST or MSMDownload.
But in the case of Nothing Phone 1, things are far more easy thanks to XDA Senior Member mark332 who put together all the required packages in one place and designed a handy flashing tool that can revive your Nothing Phone 1 from a hard brick.
Requirements
The only things you’ll need are:
- Your bricked Nothing Phone 1
- A compatible USB-C cable
- A Windows computer
- Make sure you have ADB installed on your computer.
With that side, let’s begin and follow the steps below to unbrick your Nothing Phone 1.
Note: The below steps will wipe all your data. Also, If you had unlocked the bootloader of your device, the unbricking process would relock it again. But that’s not a big deal; you can unlock the bootloader of your Nothing Phone 1 again.
How to Unbrick Nothing Phone 1 using EDL Mode
In this guide, we will show you how to unbrick the Nothing Phone 1 from a hard-bricked state and restore the stock NothingOS firmware on it. The process involves putting your phone in EDL mode and then flashing the firmware using GUI Tool.
To make it easier for you to understand, we have broken down the instructions into three major steps.
Step 1: Boot Nothing Phone 1 into EDL Mode
In most cases, a bricked device is already in the EDL Mode. You can confirm this by connecting your phone to a USB port of your computer and then going to ‘Control Panel‘ > ‘Device Manager‘.
If your phone is identified as “Qualcomm HS-USB QDLoader 9008“, then you don’t have to do anything else and skip over to step 3 directly. On the other hand, if it is identified as “QUSB_BULK“, you will need to install the Qualcomm USB drivers by following the next step.
However, if it not recognized as either of the above, then you will need to manually boot your Nothing Phone 1 to EDL mode. There are multiple ways to Boot Nothing Phone 1 to EDL Mode.
1) Using Hardware Keys:
You can force the Nothing Phone 1 to get into the EDL mode by a key combo:
- Make sure your device is completely switched off.
- Now press and hold the Volume Up and Volume Down keys simultaneously.
- While holding both keys, connect your phone to the computer using USB-C cable.
- Your device will now be booted to EDL mode.
- Again, EDL mode shows just a black screen. So open the Device Manager on your Windows computer to verify if the phone is now identified or not.
2) Using custom EDL cable:
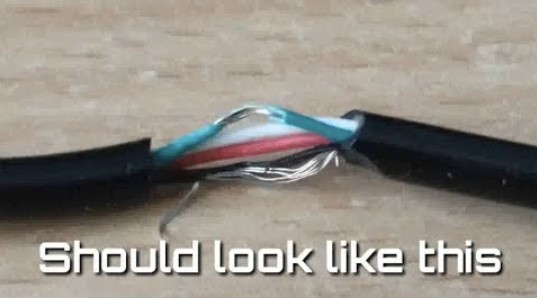
You can also enter the EDL mode of Nothing Phone 1 using custom edl type c data cable. You can found the custom made data cable on the marketplace ot you can make the custom one with existing cable. Here are the steps to make and use EDL cable method:
- Take any Type-C USB cable and cut the cable insulation open (Don’t use the original cable, instead try some cheap or secondary USB cable).
- You will see 4 wires inside [red, green, white, black].
- Now you need to connect and short BLACK and GREEN wires .
- Now power off your device by pressing the Power key for around 15-20 seconds
- With green and black wires connected, connect it to the computer while holding the Volume Up and Volume Down buttons together.
- Now the phone will be detected in EDL mode. You can now switch to the original USB cable to flash the firmware.
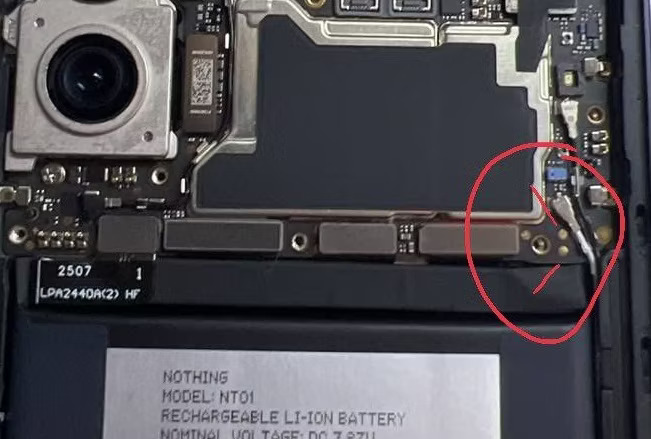
3) Using test points on Phone Motherboard:
In case the above method doesn’t work, you have to disassemble the phone and short two test points as per the below image. As soon as you short the mentioned two points and connect the cable to PC, your phone will enter into the EDL mode.
4) Using ADB:
- You can also boot Noting Phone 1 to EDL mode using ADB commands. To communicate with ADB, first you must ADB drivers for Windows PC.
- After installing the adb, connect your device to your computer via USB, and run the following command in the command prompt or terminal window on your computer:
adb devices
If this is the first time you’ve used ADB, your phone will ask for permission to connect to the computer. Grant it and re-run the above command.
- Once your phone detects, run the below command to boot Nothing Phone 1 into emergency download mode:
adb reboot edl
Note: In most cases, ADB methods won’t work on bricked devices.
Step 2: Install Qualcomm Drivers (If Required)
If your phone is identified as “QUSB_BULK“ in device manager, you will need to install the Qualcomm USB drivers. Check the below steps to verify EDL mode or to install Qualcomm Drivers:
- First, open the Device Manager on your Windows computer to verify if the phone is now identified or not.
- If your device is listed as Qualcomm HS-USB QDLoader 9008, it means you already have driver installed and you can skip to step 3.

- However, if it is identified as QHUSB_BULK or Qualcomm HS-USB Diagnostics 900e, then you will have to install the Qualcomm US Drivers on your Nothing Phone 1.
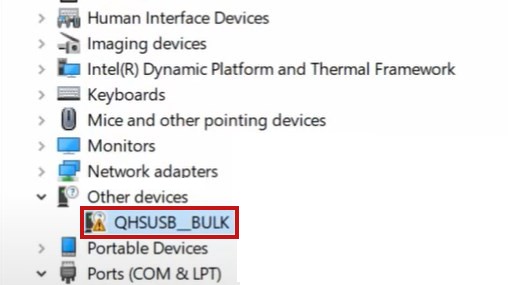
- To install Qualcomm drivers on Nothing Phone 1, download Qualcomm HS-USB QDLoader 9008 drivers as per your PC’s CPU architecture (32-bit or 64-bit).
- 32-bit version: QDLoader_HS-USB_Driver_32bit_Setup.exe
- 64-bit version: QDLoader_HS-USB_Driver_64bit_Setup.exe
- Double-click on the ‘QDLoader_HS-USB_Driver_xxbit_Setup.exe‘ executable file.
- Follow the on-screen instructions to install the driver.
Step 3: Unbrick your Nothing Phone 1 using EDL Flash tool
Once your device is setup and your PC recognizes the phone in EDL mode, you can proceed to flash the device. Follow the below steps to Unbrick Nothing Phone 1:
- First, download and extract the Nothing Phone 1 unbrick Tool on your PC.
- Make sure the Nothing Phone 1 is connected to the PC in QDLoader 9008 mode through a virtual COM port.
- Launch the tool (unbricktool.exe), select Firmware Flash, and click Start.
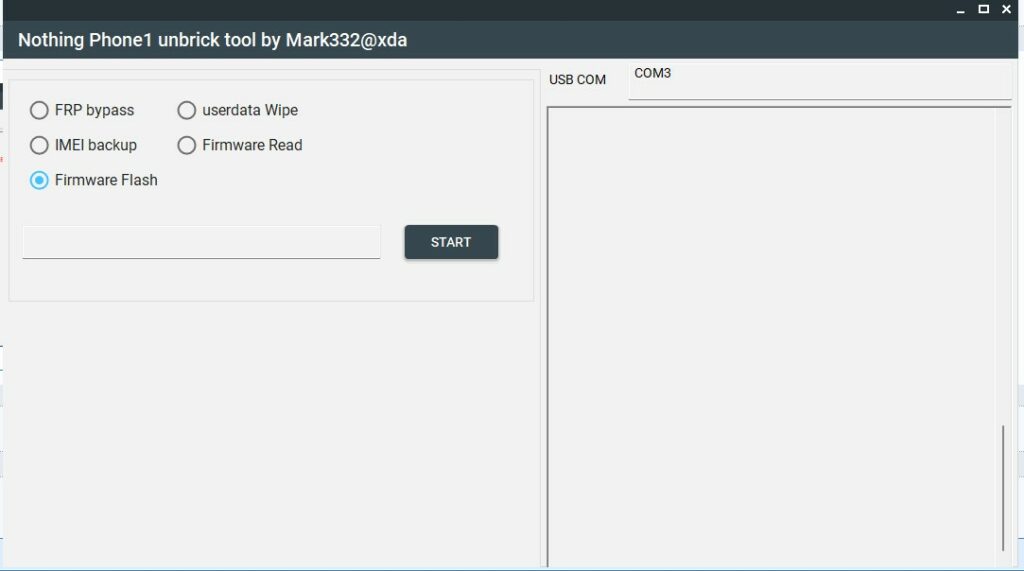
- The flashing process is now begin and once complete, your phone should reboot into a working Nothing OS.
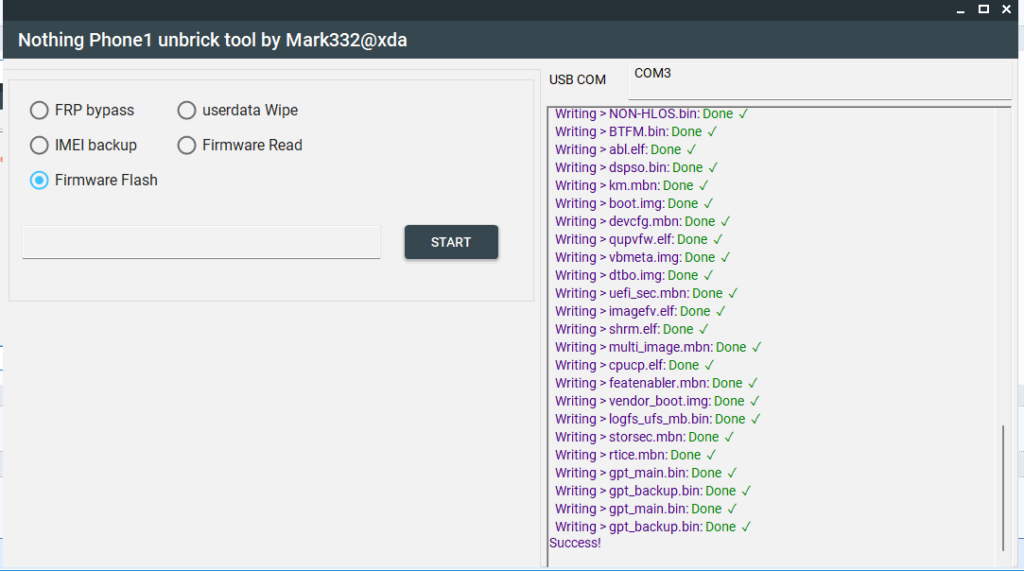
- Keep in mind that the EDL package is based on Nothing OS 1.1.7. After recovering your device from hard brick, you can update your device to the latest version manually.
Revive your Nothing Phone 1 back to Factory Firmware with EDL Unbrick tool
If you have accidentally bricked your Nothing Phone 1, then there’s a very good chance to recover it now. The tool is used for low-level firmware flashing and deals with extremely delicate partitions. So, it’s advised to only use it in dire situations, like in the case of a bricked device.

