The DNS cache holds information about recently accessed domain names and IP addresses; however, this information can become outdated or corrupted, causing internet connectivity issues. If you are facing such issues, flushing the DNS cache on Android can be helpful. This post will give a quick tutorial on how to Clear DNS Cache on Android Devices, allowing you to resume normal web browsing immediately.
What is DNS Cache on Android Devices
On an Android smartphone, DNS Cache is a temporary database that saves the IP addresses of recently visited websites. When you visit a website, your device sends a request to a DNS server, which converts the domain name (such as google.com) into an IP address. (such as 216.58.194.174). When your device gets an IP address from the DNS server, it stores it in the DNS cache so that it may be easily accessed in the future.
This speeds up the process of accessing previously visited websites since your device does not have to seek up the IP address every time. However, if the DNS cache gets outdated or damaged, it might result in slow internet browsing, difficulties accessing specific websites, and other internet connectivity issues. Clearing the DNS cache on your Android smartphone might help to alleviate these issues and improve the overall efficiency of your device.
Why it is Important to Flush the DNS Cache?
It is important to flush the DNS cache since it can become outdated or damaged over time, resulting in difficulties with your internet connection, such as slow page loading times or inability to visit specific websites.
When you visit a website or use an app, your device must obtain the IP address associated with the domain name. This procedure, known as domain name resolution, entails submitting a request to a DNS server in order to get the IP address. When your device receives an IP address, it keeps it in its DNS cache. This enables your device to obtain the IP address for the same website or app without having to go through the complete domain name resolution procedure again in the future.
However, if the DNS cache becomes corrupted or out-of-date, your device may retrieve the wrong IP addresses or be unable to access specific websites. In order to retrieve the most recent DNS information from the DNS server, it is necessary to clear the DNS cache. This can help improve your internet performance, troubleshoot connectivity issues, and increase your online privacy and security.
Benefits of Clearing the DNS Cache on Your Android Device
Clearing your Android device’s DNS cache is a simple but effective technique to boost internet performance, fix connectivity difficulties, and increase your privacy and security when browsing the web.
Clearing the DNS cache on your Android smartphone has various advantages, including:
- Improved Internet Performance: If your device is having trouble connecting to the internet or loading pages, you may want to try clearing the DNS cache to get rid of any old or broken DNS entries.
- Troubleshooting Connectivity Issues: If you’re having trouble connecting to particular websites or apps, deleting the DNS cache can assist by forcing your device to acquire the most recent DNS information.
- Improved Privacy: By eliminating any DNS information that may be saved on your device, clearing the DNS cache can assist in preserving your privacy. This information might possibly be used to track or monitor your internet activities.
- Enhanced Security: By erasing any DNS data kept on your device, clearing the DNS cache may be an effective privacy measure. Your online behavior and habits may be monitored or tracked with this data.
- Faster Browsing Experience: By allowing your device to immediately receive the most recent DNS information for websites and applications, clearing the DNS cache can help to speed up your browsing experience.
How to Clear DNS Cache on Android Devices
If you follow the steps below, you should be able to clear the DNS cache on your Android device. This can help fix any connection problems you may be having. Keep in mind that the steps might be a little different based on your Android version and device manufacturer.
Method 1: Clear DNS Cache using Chrome
Google Chrome, the default web browser for Android, includes an internal DNS cache. You can clear the Chrome web browser’s DNS cache by following these steps:
- Open Chrome on your Android device.
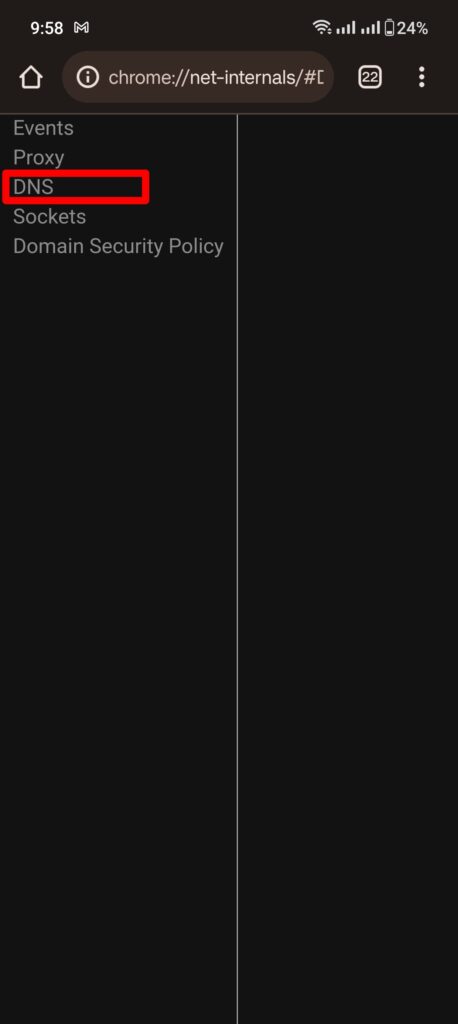
- Type chrome://net-internals/#DNS into the Chrome search bar.
- In the left pane of the DNS lookup page, select DNS.
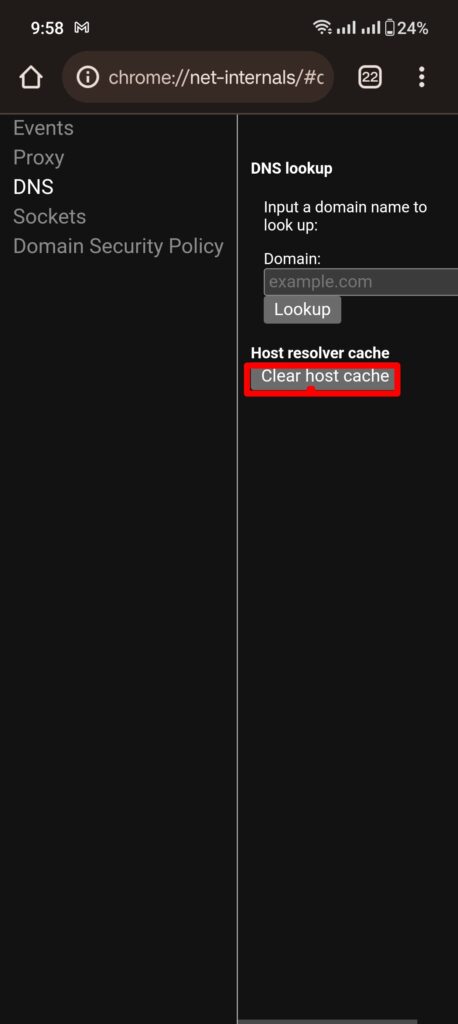
- From the right-hand panel, select the Clear Host Cache option to flush the DNS cache on your Android device.

Method 2: Modify the Wi-Fi network to Static
Changing your Android device’s Wi-Fi network settings to Static can also help you flush the DNS cache. Here’s how to do it:
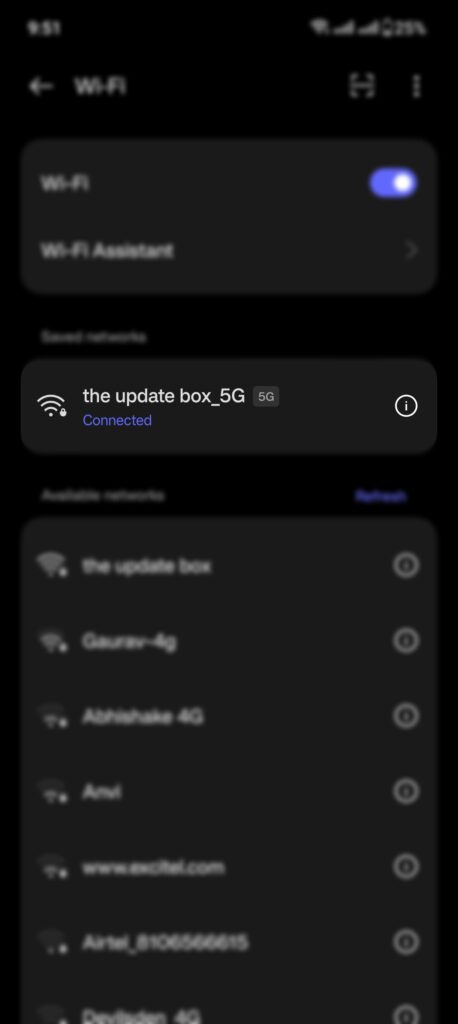
- Open the Settings app on your Android device.
- Tap on Wi-Fi and then tap on either the name of the network or the gear icon located beside it.
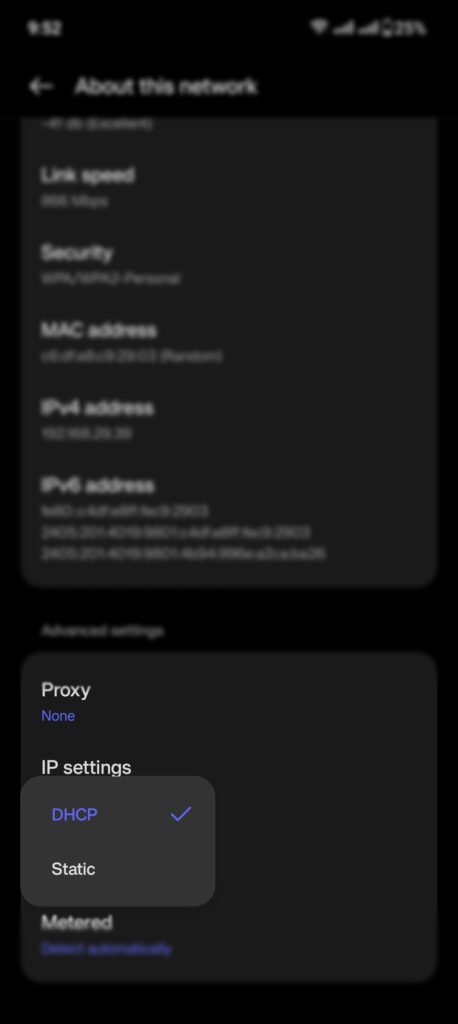
- Tap on IP settings and select Static from the dropdown menu.
- Enter the IP address, subnet mask, gateway, and DNS servers that you want to use. You can obtain this information from your network administrator or from the router’s configuration settings.
- Reconnect to the same network and wait for your device to obtain the new IP address and DNS information. This will flush the DNS cache on your Android device.

Method 3: Clear DNS Cache through the Settings app
- Open the Settings app on your Android device.
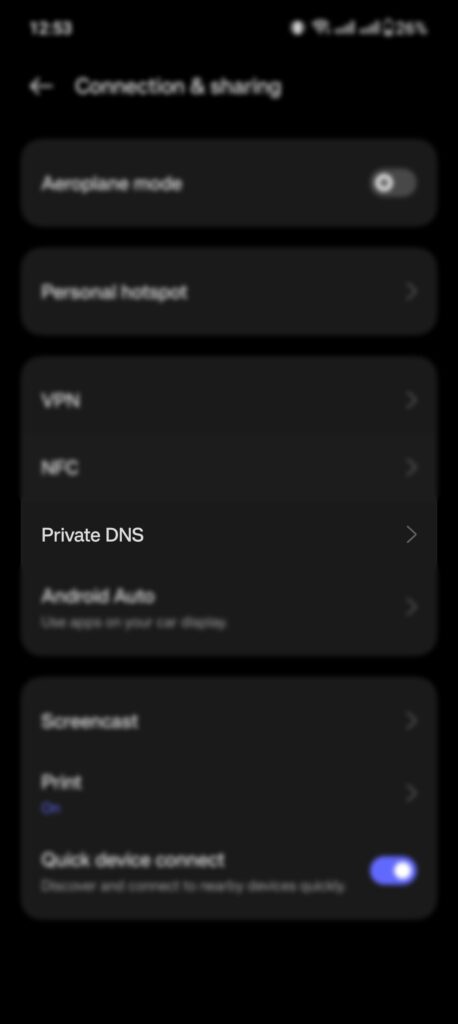
- Tap on Network & Internet or Wireless & Networks, depending on your Android device.
- Tap on Advanced or More depending on your Android version.
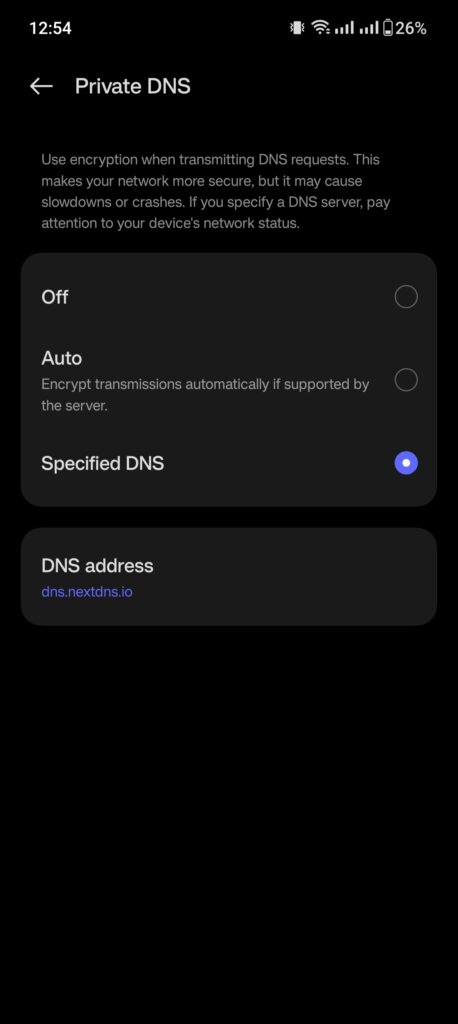
- Tap on Private DNS or Private DNS provider hostname.
- If you see a hostname or DNS address, remove it.
- Tap on Save or Apply to flush DNS Cache on Android Devices.
Method 4: Clear DNS Cache through the Android Terminal Emulator app
With a single command, you can flush the DNS cache system-wide on your Android phone if you are a rooted user.
- Download and install the Android Terminal Emulator app from the Google Play Store.
- Launch the app and type the following command:
su
- Grant root access when prompted.
- Type the following command to clear the Android DNS cache:
ndc resolver clearnetdns wlan0
- Wait a few seconds for the DNS cache to clear.
- Type the following command to exit the Terminal Emulator app:
exit
Flush DNS Cache on Android Devices to Resolve Internet Issues
Clearing the DNS cache on your Android device can enhance internet performance, resolve connectivity issues, and safeguard your privacy. By following the step-by-step guide in this blog post, it’s easy to clear DNS cache on Android device and make browsing faster and safer.