These days, mobile devices contain many important data, including contacts, messages, videos, images, calendars, and important documents. Your phone allows you to quickly access these items no matter where you are, but what if anything happens to it? Keeping a current backup of your Android phone and all of the data it contains is a critical job. We have provided a comprehensive tutorial for Backup Android Phone.
There’s always the risk of misplacing your phone or dropping it in the water and losing everything. Fortunately, there are several ways to Backup your Android Phone, assuring that even if your phone is damaged, you will not lose your data. Most of the time, you simply need to set up cloud backups so that entering into your account on a new device automatically uploads most of your data. However, not everything can be stored in this manner, so frequent backups of your phone are still necessary. We’ve compiled a list of every method available to backup Android phone data.
Why Backup Your Phone?
Making a backup of your phone is critical for keeping your data safe in the event that your phone is damaged, misplaced, or stolen. You might also want to back up if you’re getting a new phone or have run out of storage space on your device and want to preserve a duplicate of your stuff on your computer or in the cloud.
These days, maintaining data sync and backing up an Android smartphone requires no additional technical knowledge. Most of the work is completed smoothly and automatically in the background, without your input or with a one-time opt-in when you initially set up your phone. Additionally, since most data restoration processes are straightforward, you won’t need to manually transfer your files or reinstall each app one at a time. All you must do is log into a new device with your Google credentials.
Best Way to Back up Android Phones?
There isn’t a single, effective way of backing up and restoring Android phones that satisfies everyone’s requirements. To make things simple yet effective, many users can choose a cloud-based system with automatic backups. Of course, some people might want to manually build their backups and store them offline to keep them safe.
When you look into backups for your individual device, you’ll discover many possibilities. There’s no right or wrong way to do things here; your choice depends entirely on your individual wishes and needs for your particular device. We’d like to highlight a few popular techniques in this post that you could consider while backing up and restoring your Android phone.
How to Backup Android Phone 2023
There are several options to backup an Android phone, whether through Google, a third-party software, or your PC, to ensure you never wind up with lost data.
How to back up your Android phone with Google
Google’s cloud service is the best and simplest option to back up your Android phone. You may back up your phone’s content, data, and settings to your Google Account. You may restore your backup data to the original phone or other Android devices. To back up different sorts of data, you’ll need to use separate Google services.
1) Backup Photos and videos
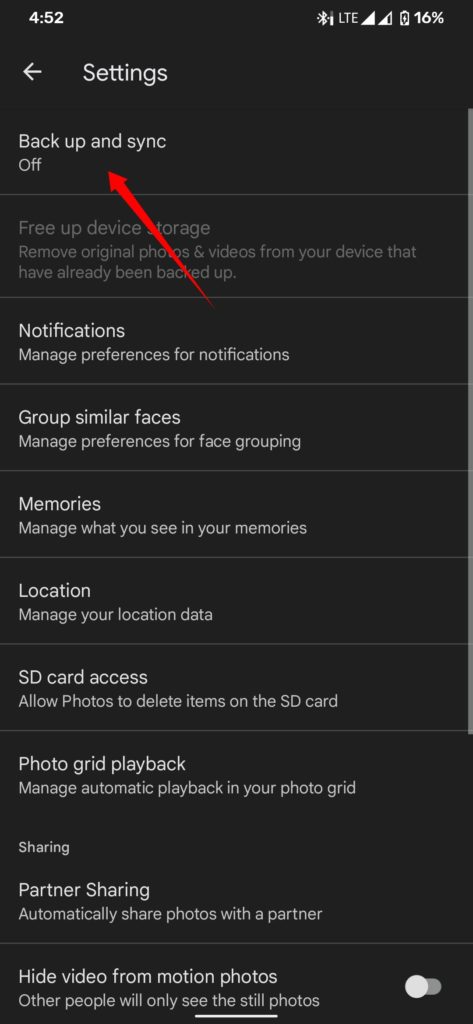
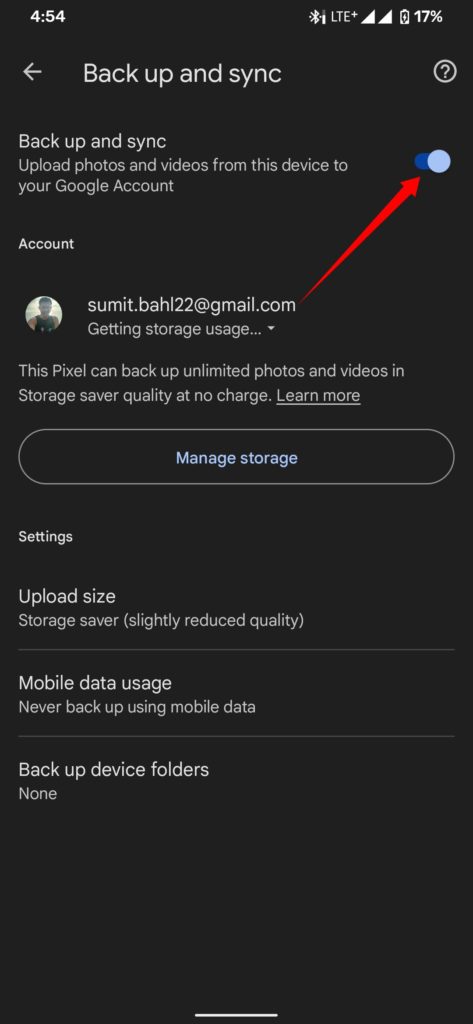
To back up your photos and videos, we recommend Google Photos. Google Photos is a free service that provides up to 15 GB of cloud backup space for photos and videos, as well as access to all of your Google Drive data. You may download the Photos app if it isn’t already on your phone. Once installed, enable the Backup and Sync feature to store your images and videos to your Google Account automatically.
- Open Google Photos.
- Sign in to your Google account.
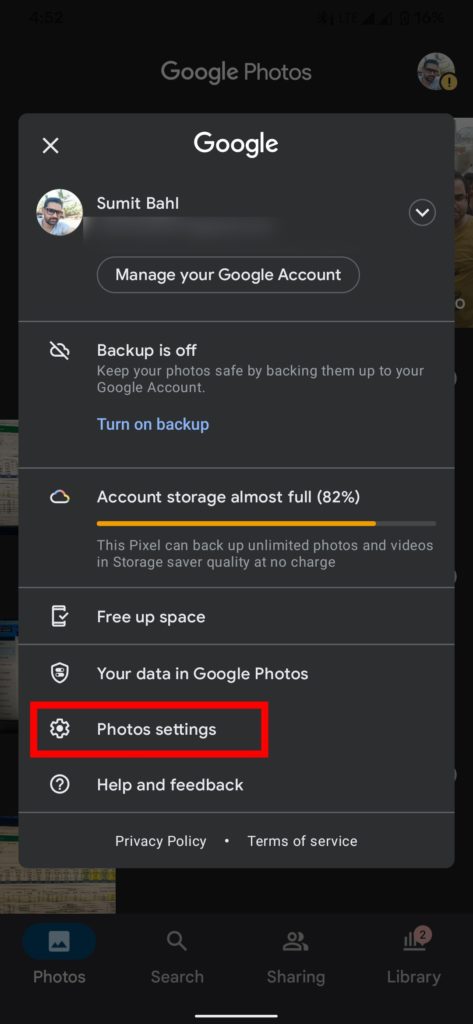
- Tap on the profile image in the top-right corner.
- Select Photo Settings and tap Back up & Sync.
- Turn on the toggle next to Back up & sync.
2) Backup your Phone Contacts, Calendar, and Email
Backing up your phone contacts, calendar, and emails is simple. If you already have Gmail installed, you don’t need to back up your phone’s contacts, email, or calendar data individually. If you currently use Google Contacts on your existing phone, you can download the app on your new phone, sign in to your Google account, and all your contacts will be immediately synchronized.
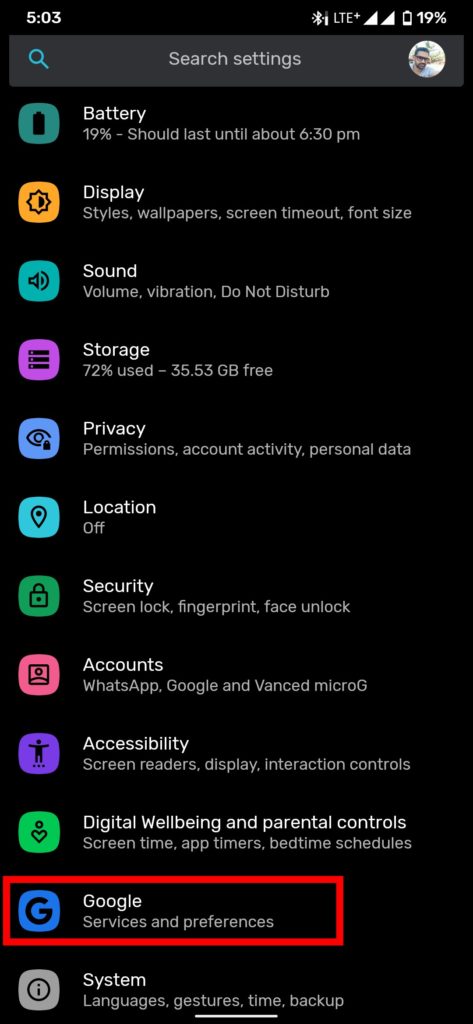
- Open your phone’s Settings app.
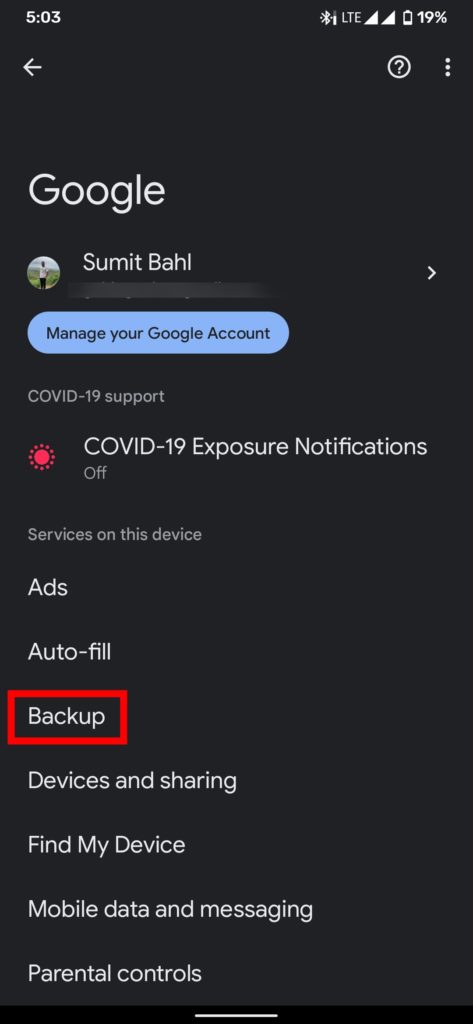
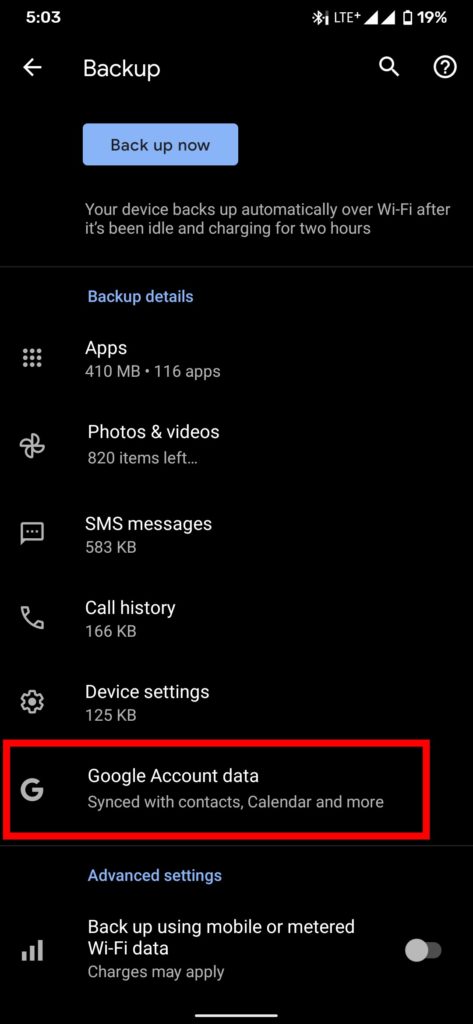
- Tap Google -> Backup -> Google Account data.
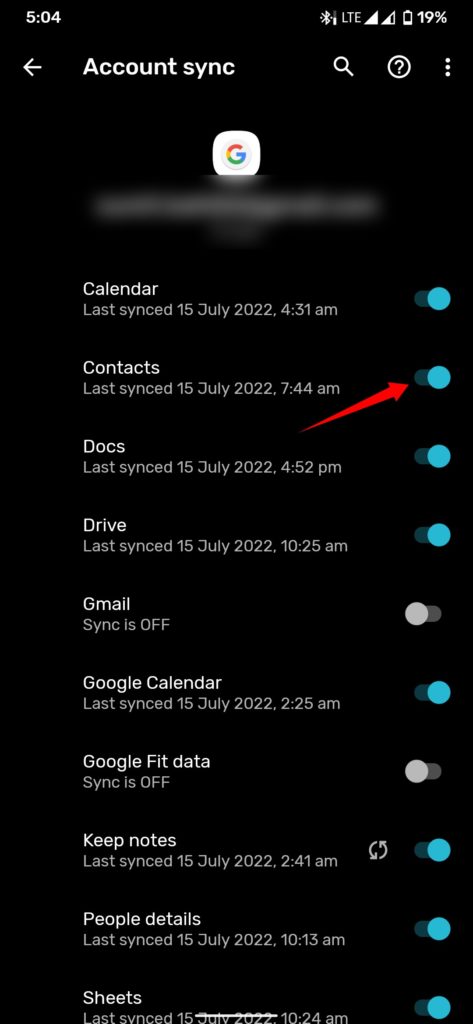
- Turn on the toggle next to Contacts.
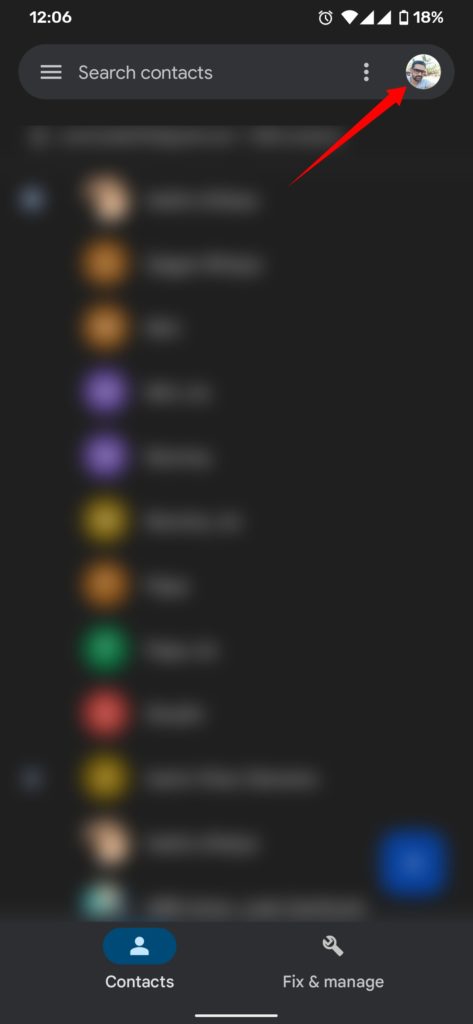
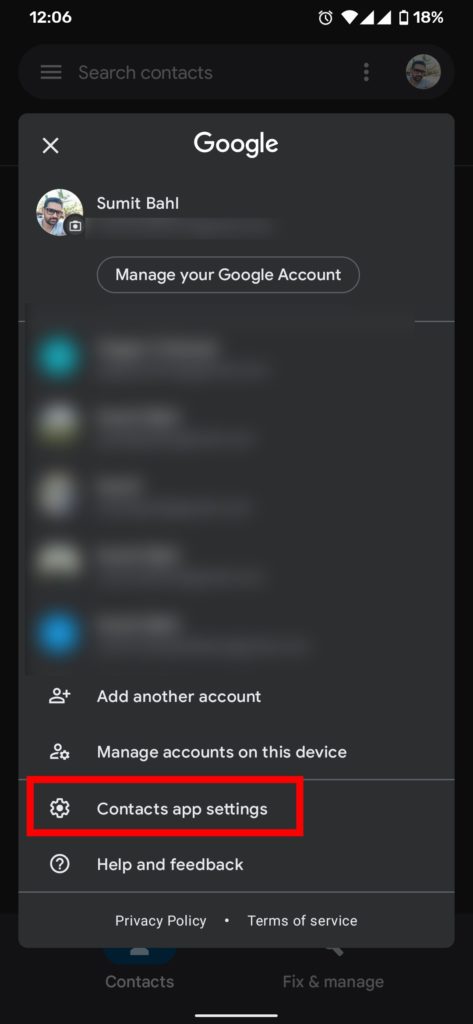
- Tap Google Contacts sync settings and select your Google account.
- Select Manage Settings under Also sync device contacts.
- Toggle on Automatically Backup & sync device contacts.
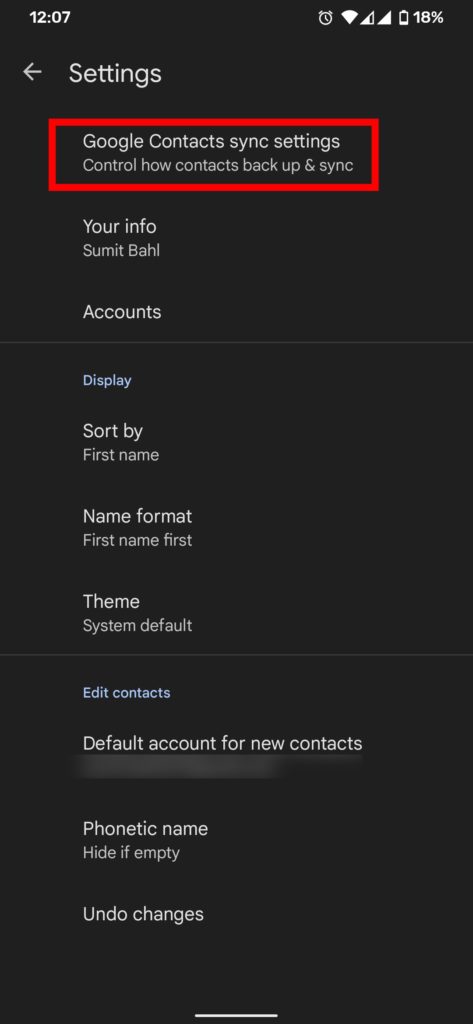
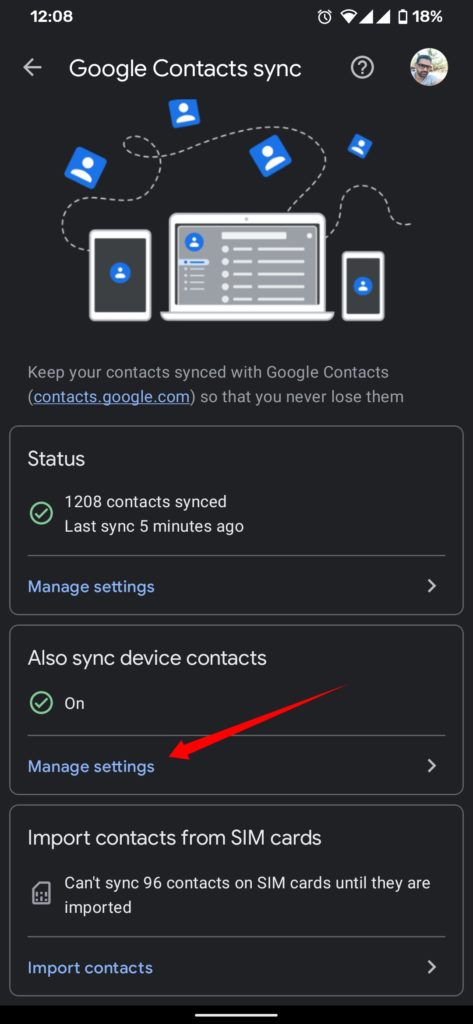
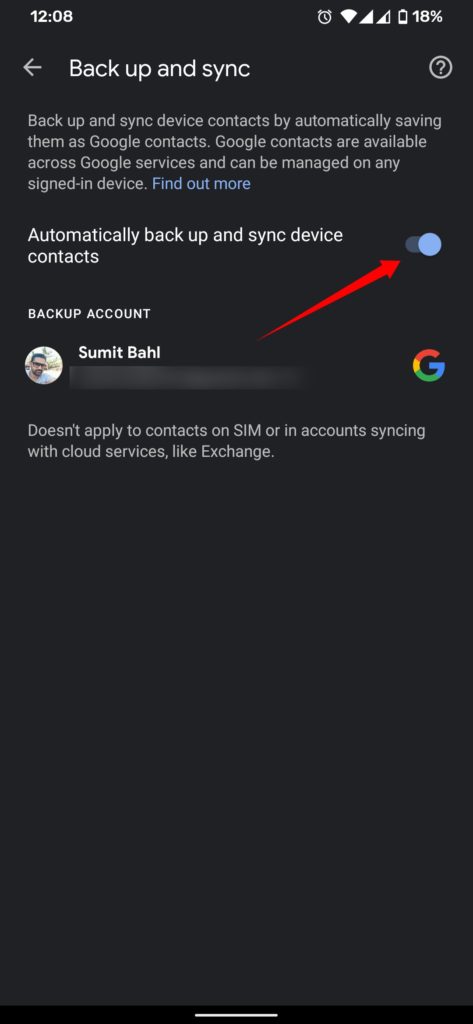
Since email and calendar data are stored in the cloud, you don’t need to back them up individually. To recover it, just open the email or calendar app on a different device.
3) Backup your Files
You have two choices for backing up files you’ve downloaded or saved to your phone’s storage. You may either connect your phone to your computer and manually transfer the data, or you can use cloud storage services such as Google Drive. Google Drive allows you to save your other files on the cloud, making them available from any connected device.
- Download the Google Drive app if you don’t have it already.
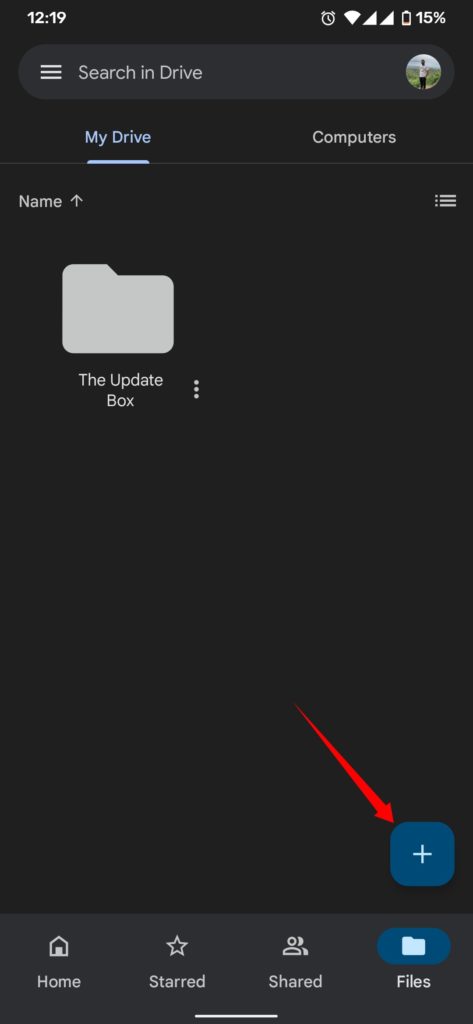
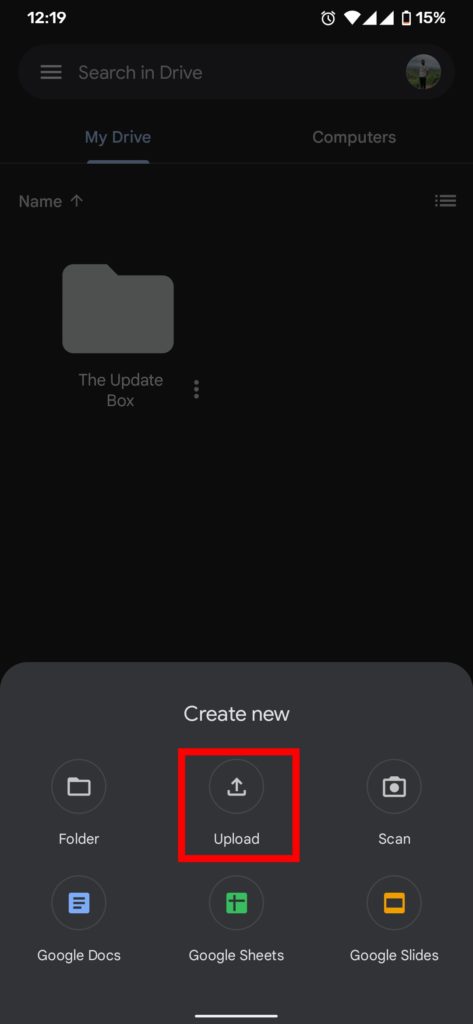
- Tap the + icon in the bottom-right corner.
- Press Upload.
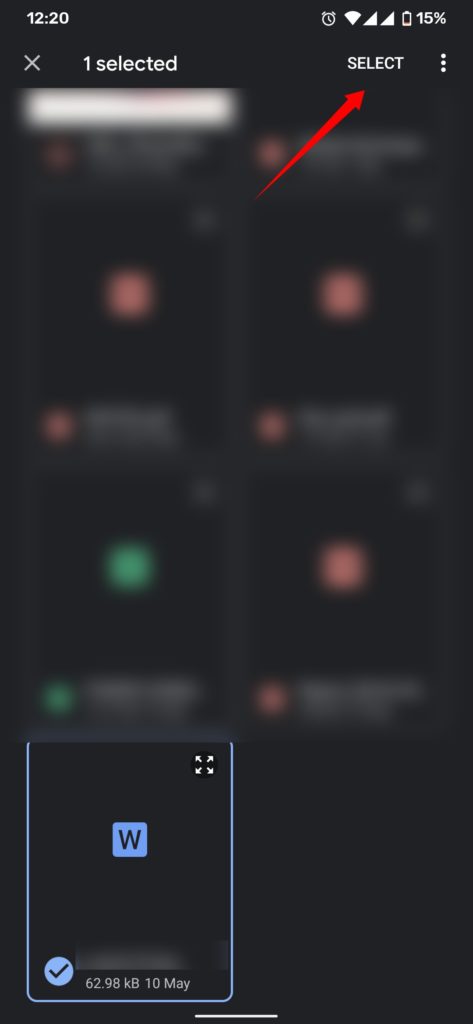
- Select the files you’d like to back up.
- Done.
4) Backup all other Settings, apps, SMS, call history, and other using Backup by Google One
Android’s native cloud backup feature allows you to save settings, applications, SMS messages, and even call history. As a result, restoring everything to a new phone is simple. Your phone will automatically back up the following data when the backup is enabled:
- App data
- Call history
- Contacts
- Device Settings
- SMS messages
- Pictures and videos
- Gmail and other Google Apps settings
- Google Calendar events and settings
- Date and Time
- Wallpapers
- Wi-Fi networks and passwords
Here is how to turn on Backup your phone data on Android devices.
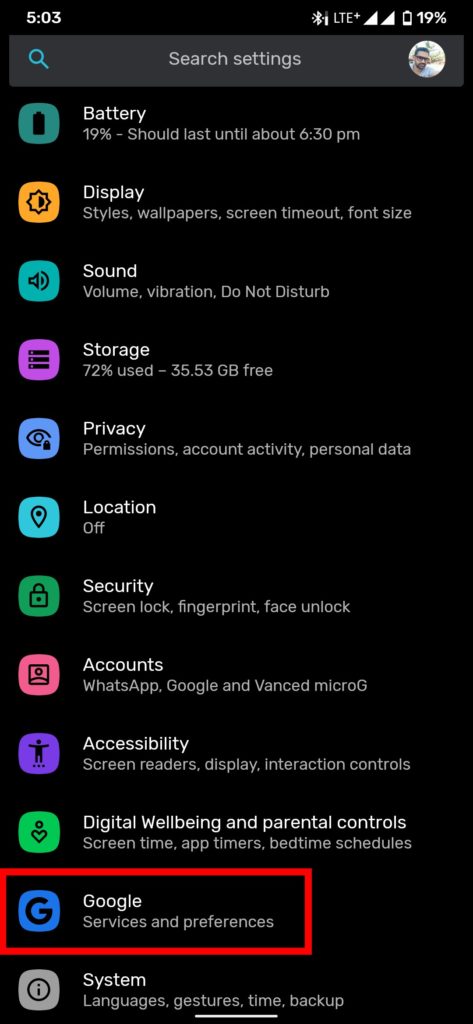
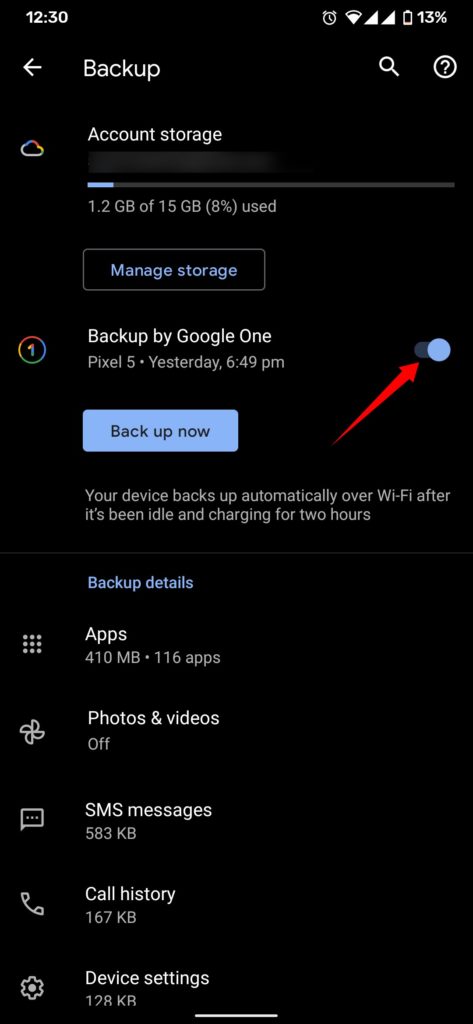
- Open your phone’s Settings app.
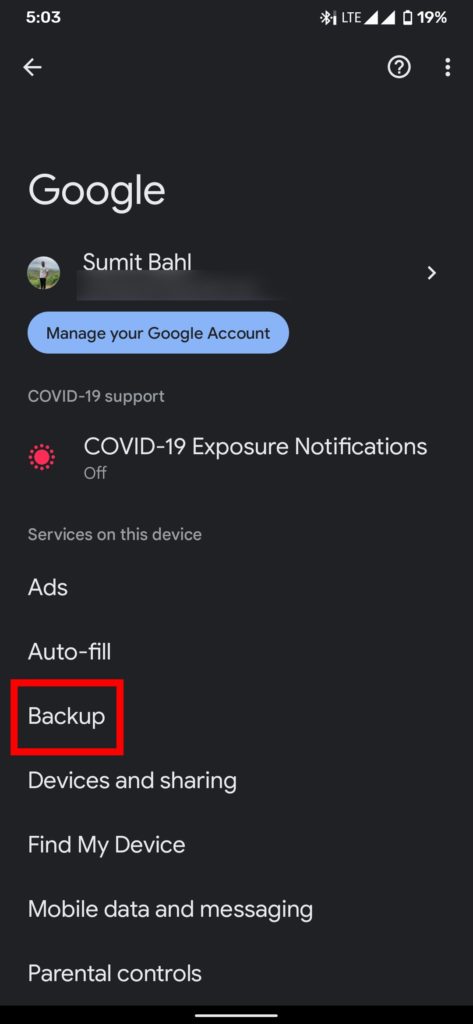
- Tap Google -> Backup.
- Toggle on Backup by Google One.
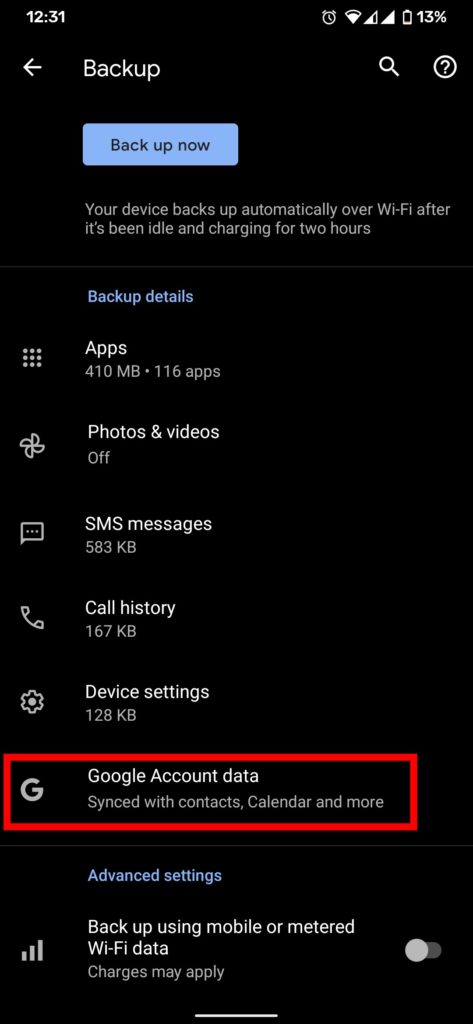
- Scroll down and tap Google Account data.
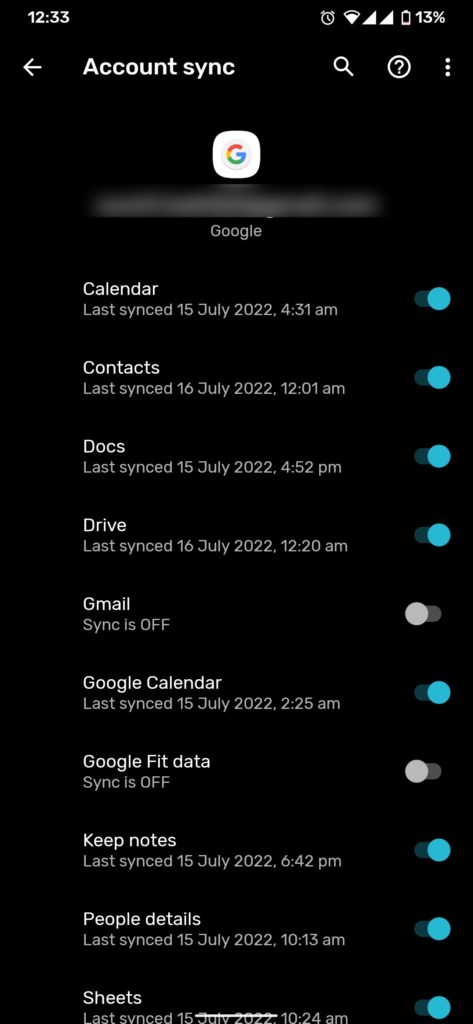
- Select the data you want to sync. This includes the Calendar, Docs, Sheet, Google Fit, Keep, etc.
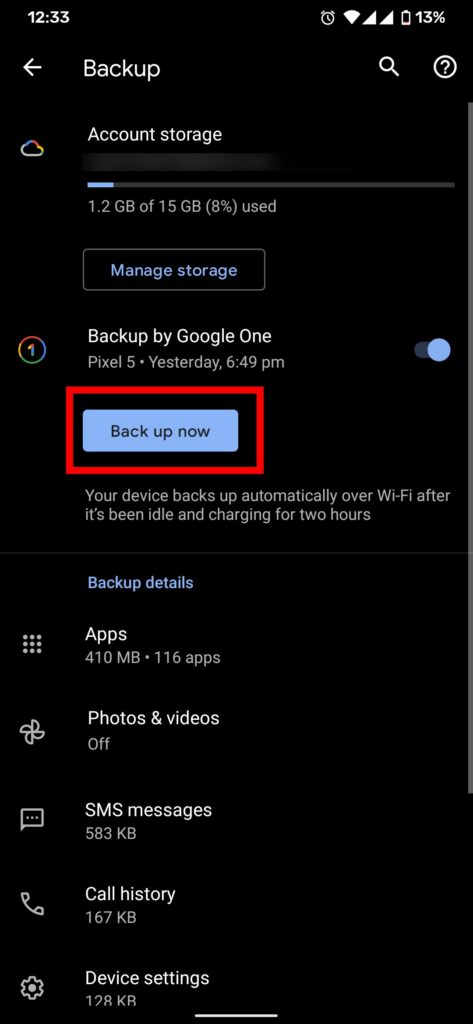
- Go back to the main Backup settings.
- Tap on Back up now.
Manually Back up Android devices to PC
It is quite simple and quick to back up Android phone data to a PC. Simply connect your Android phone to a PC, select the File Transfer USB option, and copy everything in the Internal Storage folder to a new folder on your PC.
Unfortunately, this method will only allow you to access and copy music, images, movies, documents, and other downloaded stuff from your Android phone. We recommend trying alternative techniques to back up your messages, contacts, or applications.
1) How To Backup Android Device Data to Windows PC
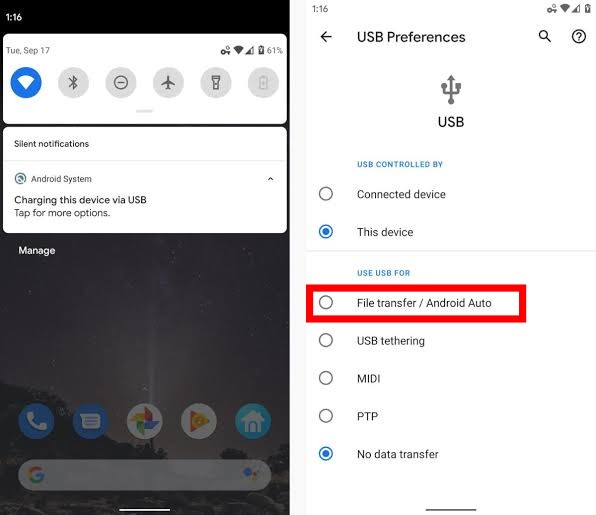
- Connect your Android smartphone and computer using a USB cable.
- On the phone, you will get a notification on your Android phone about the USB connection. Tap on it.
- Select File Transfer / Android Auto.
- On Windows PC, visit My Computer and open your phone’s storage space.
- Create a new folder on your computer and copy all the Android phone files you want to back up into the created folder.
2) How to Backup Android Files on Mac using Android File Transfer
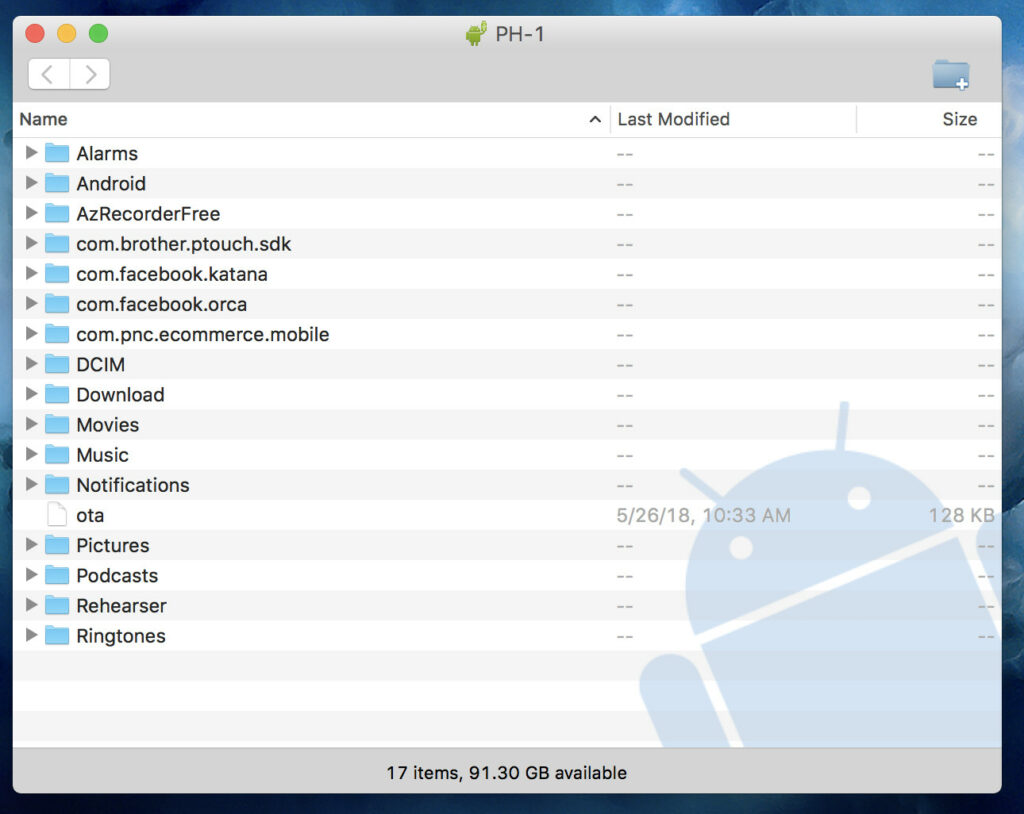
- First, download and install the Android File Transfer app.
- Connect your phone to a USB port on your Mac.
- An Android File Transfer window should open on your Mac, and you will see a list of folders and files on your phone.
- Done.
Backup your Android phone data using a third-party app
Doing everything individually is time-consuming, and the easiest method to back up your phone is to use a third-party all-in-one backup app. With these tools, backing up your contacts, SMS, Call logs, bookmarks, calendars, and applications are simple, and you can restore each item separately depending on your needs.
Swift Backup and Titanium Backup (only for rooted devices) are excellent backup applications for your Android device. Swift Backup is recommended because it is fast, simple, and has a good interface. You can back up everything, including apps, app data, contacts, images, browser bookmarks, system settings, home screen shortcuts, call logs, alarms, calendars, applied wallpapers, WiFi network configurations, and more. Swift Backup enables you to perform bulk activities with a few quick taps. You may select the apps you want to save, hit a button, and it will do the rest.
Users may specify where backups should be saved for later retrieval, and you can also plan automatic backups in addition to backing up to cloud storage. Some tasks, such as backing up app data, configuring wifi, or performing a batch backup or restoration, require root access. Premium features include cloud backups for apps, configurable backup/restore settings for apps, and scheduled backups.
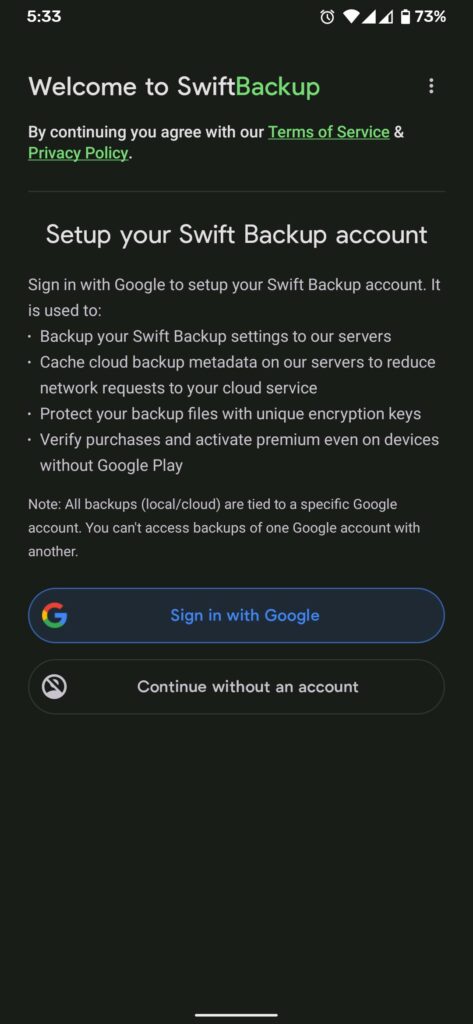
- Open Swift Backup.
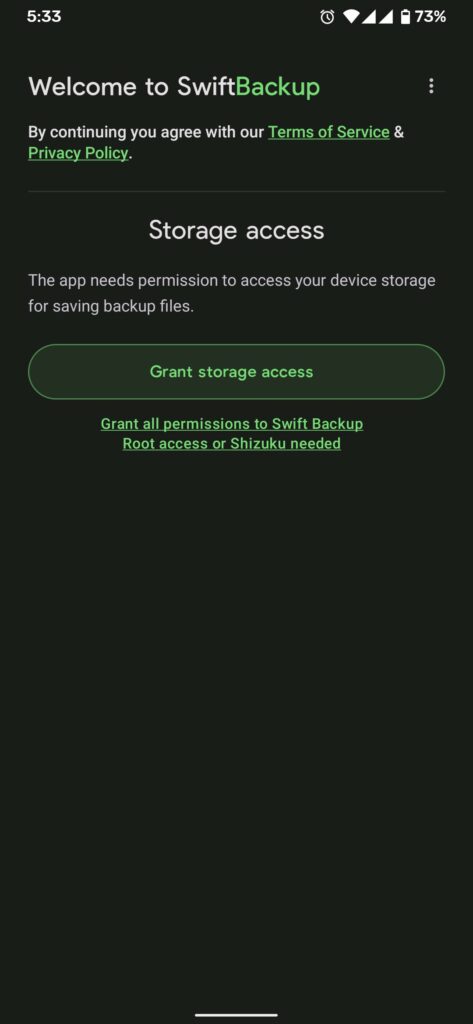
- Log in with your Google account and allow storage access. Since the backup is encrypted and linked to your account, the app needs a login to prevent data theft.
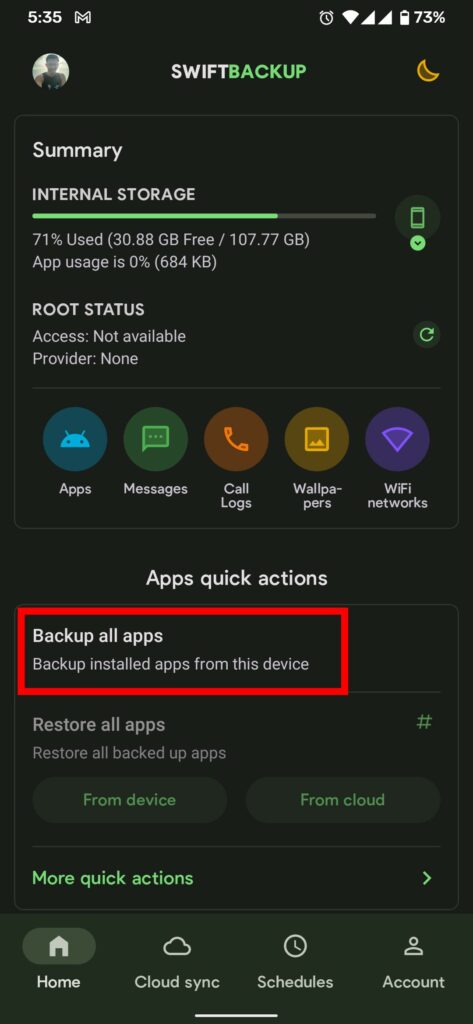
- Open the apps and tap Backup all apps.
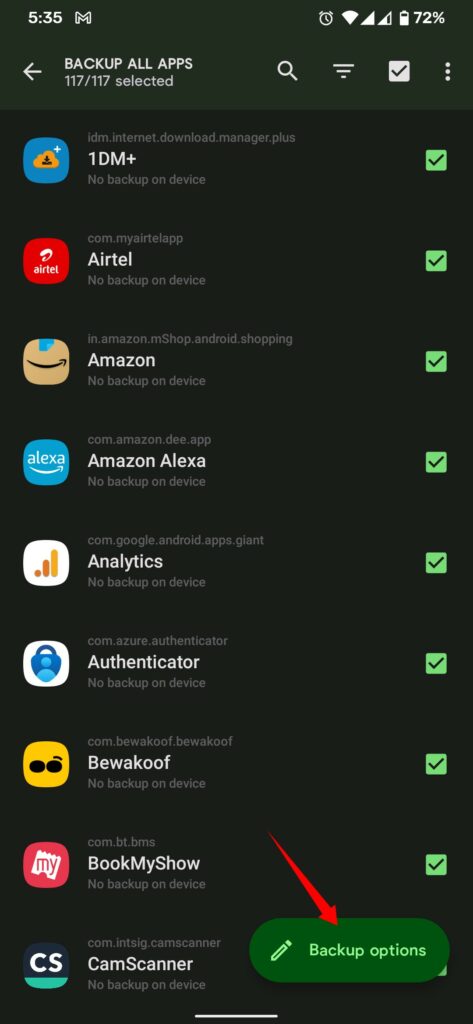
- Select apps that you want to back up and then tap Backup options.
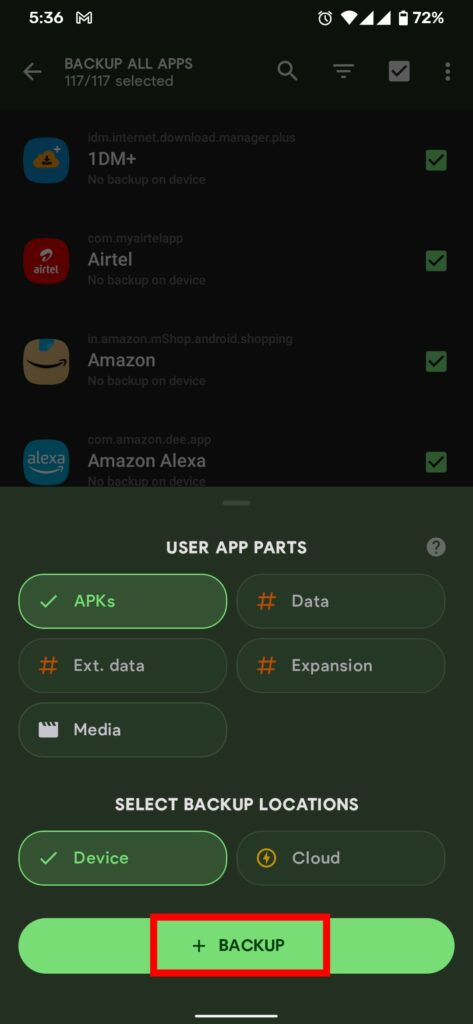
- Now, tap Backup.
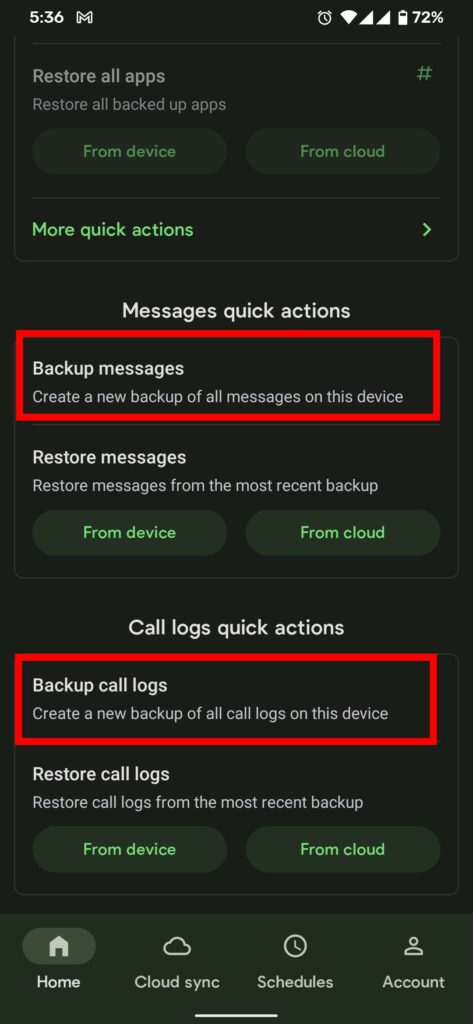
- Additionally, you can backup Android phone contacts and messages as well.
Backup Android phones completely using NANDroid backups
If you want to try out new ROMs and custom kernels or want to mod your device, then Nandroid backup is the best option for you. You can easily switch between ROMs by backing up and restoring entire images.
NANDroid backup is capable of creating a complete copy of the Android system and backing up applications and personal data. However, it won’t back up any downloaded files or photos stored on your computer, but you can simply manage so by using the manual method described above. Here is how to back up an Android phone using a NANDroid backup.
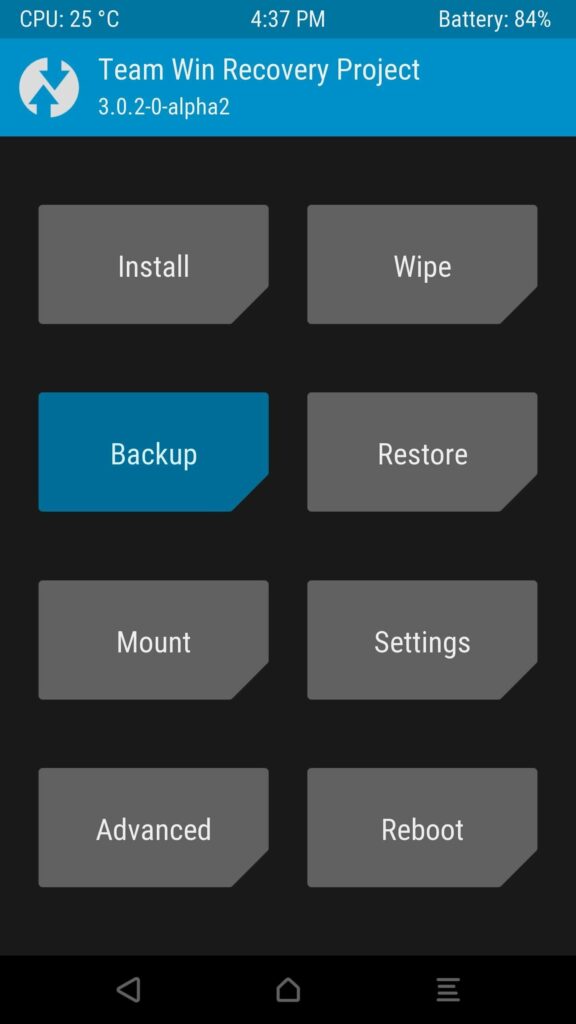
- Enter recovery mode on your Android device.
- Tap the Backup button.
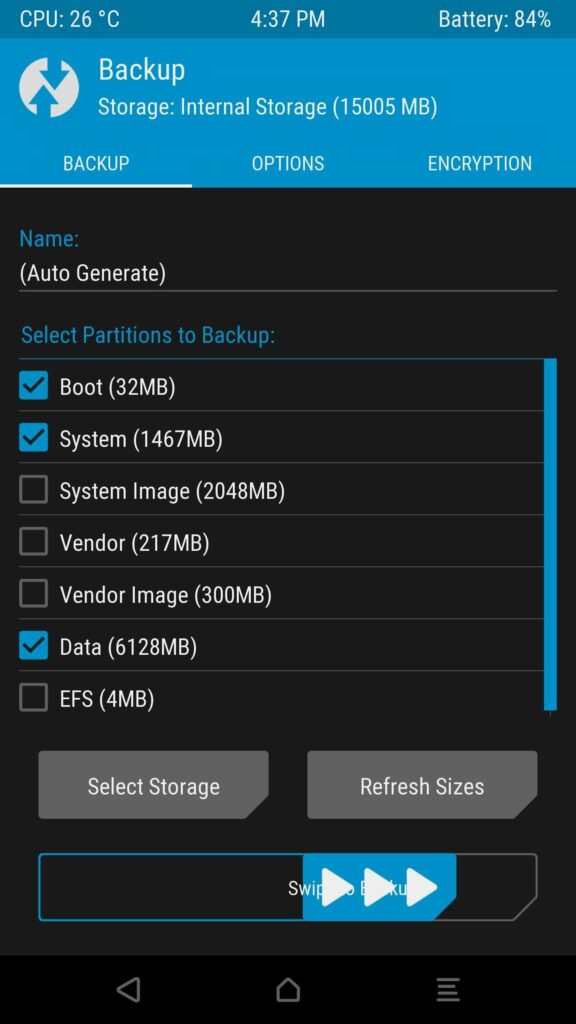
- Choose which partitions to back up. Select Default if you want to back up your device.
- Go to the Backup tab, and swipe to start the backup process.
- Done.
Backup Android to PC wirelessly with Syncthing
Wireless sync has become an increasingly convenient and efficient method for keeping files and data synchronized across multiple devices. Syncthing, a powerful open-source file synchronization tool, offers a seamless wireless sync solution for users looking to keep their files up to date across different platforms and devices.
With Syncthing, you can effortlessly sync files between your Android phone, computer, and other devices, eliminating the need for cables or manual transfers. This innovative technology ensures that your files are automatically and securely synchronized in real-time, allowing you to access and work on the latest versions of your documents, photos, and other important files wherever you are. Whether you’re collaborating with colleagues, managing personal files, or keeping your digital life in order, wireless sync with Syncthing simplifies the process and provides a reliable solution for seamless file synchronization.
- Install Syncthing: Install Syncthing on all the devices you want to synchronize. Syncthing is available for various operating systems, including Windows, macOS, Linux, and Android. Visit the Syncthing website or the respective app store for your device to download and install it.
- Set Up Devices: Launch Syncthing on each device and configure them to connect with each other. Each device will have a unique Device ID. Add each device’s ID to the other devices’ Syncthing interface to establish connections between them. This can be done by entering the Device ID manually or using a QR code.
- Create a Folder: Select a folder on each device you want to sync. This folder can be an existing folder or a new one specifically created for synchronization purposes. Configure the folder settings, such as read-only or read-write access, according to your preferences.
- Share the Folder: Share the folder with the other devices by entering their Device IDs and granting appropriate permissions. This allows the devices to access and sync the files within the folder.
- Syncing: Once the devices are connected, and the folder is shared, Syncthing will start syncing the files automatically. It will monitor the folder for changes and synchronize any modifications, additions, or deletions across all the connected devices.
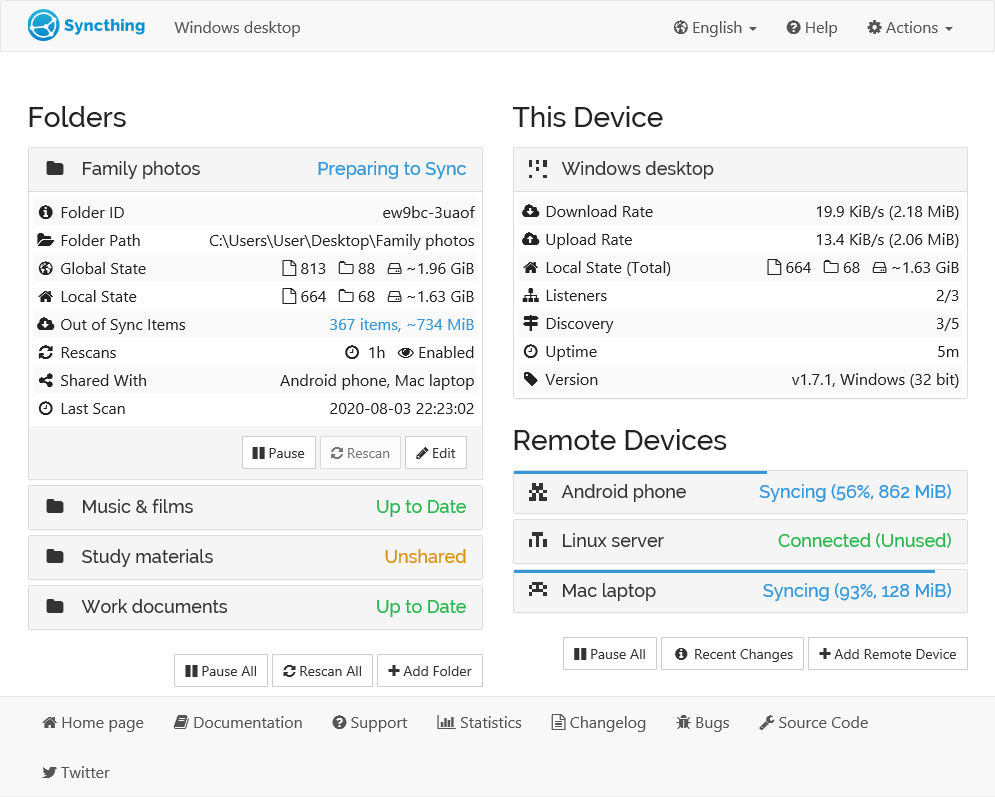
- Monitor and Manage: You can monitor the synchronization progress and manage settings through the Syncthing web interface. Access the interface by opening a web browser and entering “localhost:8384” or “127.0.0.1:8384” in the device’s address bar running Syncthing. From the interface, you can view the synchronization status, add or remove devices, adjust settings, and more.
Other Methods to back up your Android Smartphone
We’d like to provide a few more techniques. These approaches may not be as convenient as others we have shared, but they may be valuable to some people.
1) Using cloud services other than Google
The most convenient and preferable method of backing up an Android smartphone is to use Google’s cloud service. However, it is possible that you have exceeded your Google storage. Several other cloud services are accessible where you may keep your device data, such as Dropbox, Microsoft’s OneDrive, MEGA, and others. Most provide free cloud storage, which may be sufficient for most users.
2) Using Manufacture In-built backup solution
Most device manufacturers provide their customers with a proprietary backup solution. Samsung makes use of the Samsung Smart Switch, LG makes use of the LG Mobile Switch, Sony makes use of Xperia Transfer 2, and OnePlus makes use of the OnePlus Switch app. These manufacturer applications allow you to transfer your photos, videos, music, text messages, calendars, apps, and other data to your new smartphone.
Wrapping Up: Back up everything on Android
You don’t want to lose crucial data or photos because you failed to back up your phone. Rather than wishing you had backed up everything, take the time to back up your phone.
In the preceding tutorial, we’ve highlighted a few of the most widely used and effective approaches. Any of the backup methods might rescue you from the agony of losing all of your essential data.

